Wednesday, March 27, 2013

Peacock Birthday


My darling Kate turned 6 yesterday and she requested a peacock theme for the celebration. Honestly I was a little scared when she made the request a few weeks ago. I'd never seen a peacock birthday and wasn't feeling very creative. I've never said no to a request and I'm glad I didn't this time because we were both thrilled with how everything turned out.  Once again we celebrated with a simple family dinner and cake, but I tried to make it special. 

Her birthday outfit:
 If you look close you can see all the peacockish designs in the fabric.  

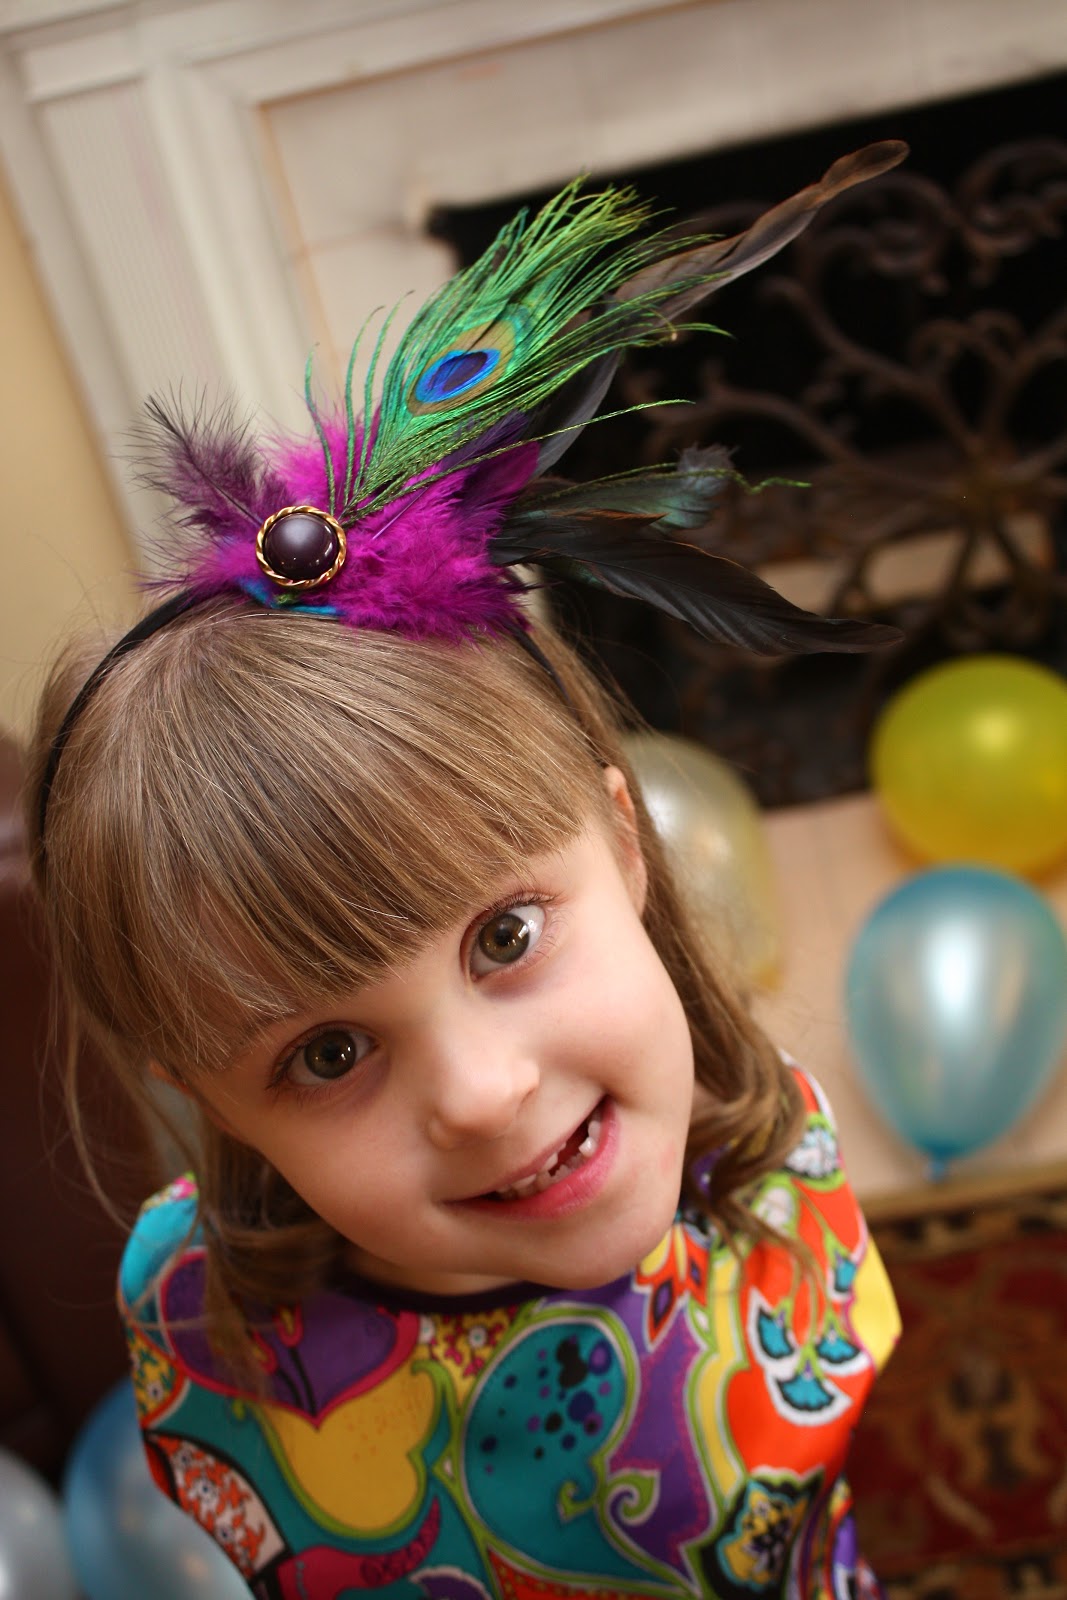
 My favorite part of the outfit was her headband. She was so excited to wear a real peacock feather. 

The decorations:
 I kept is pretty simple with just a couple of tissue paper tassel garlands...
 and some chalk art. 
 I was pretty proud of my late night peacock drawing. 
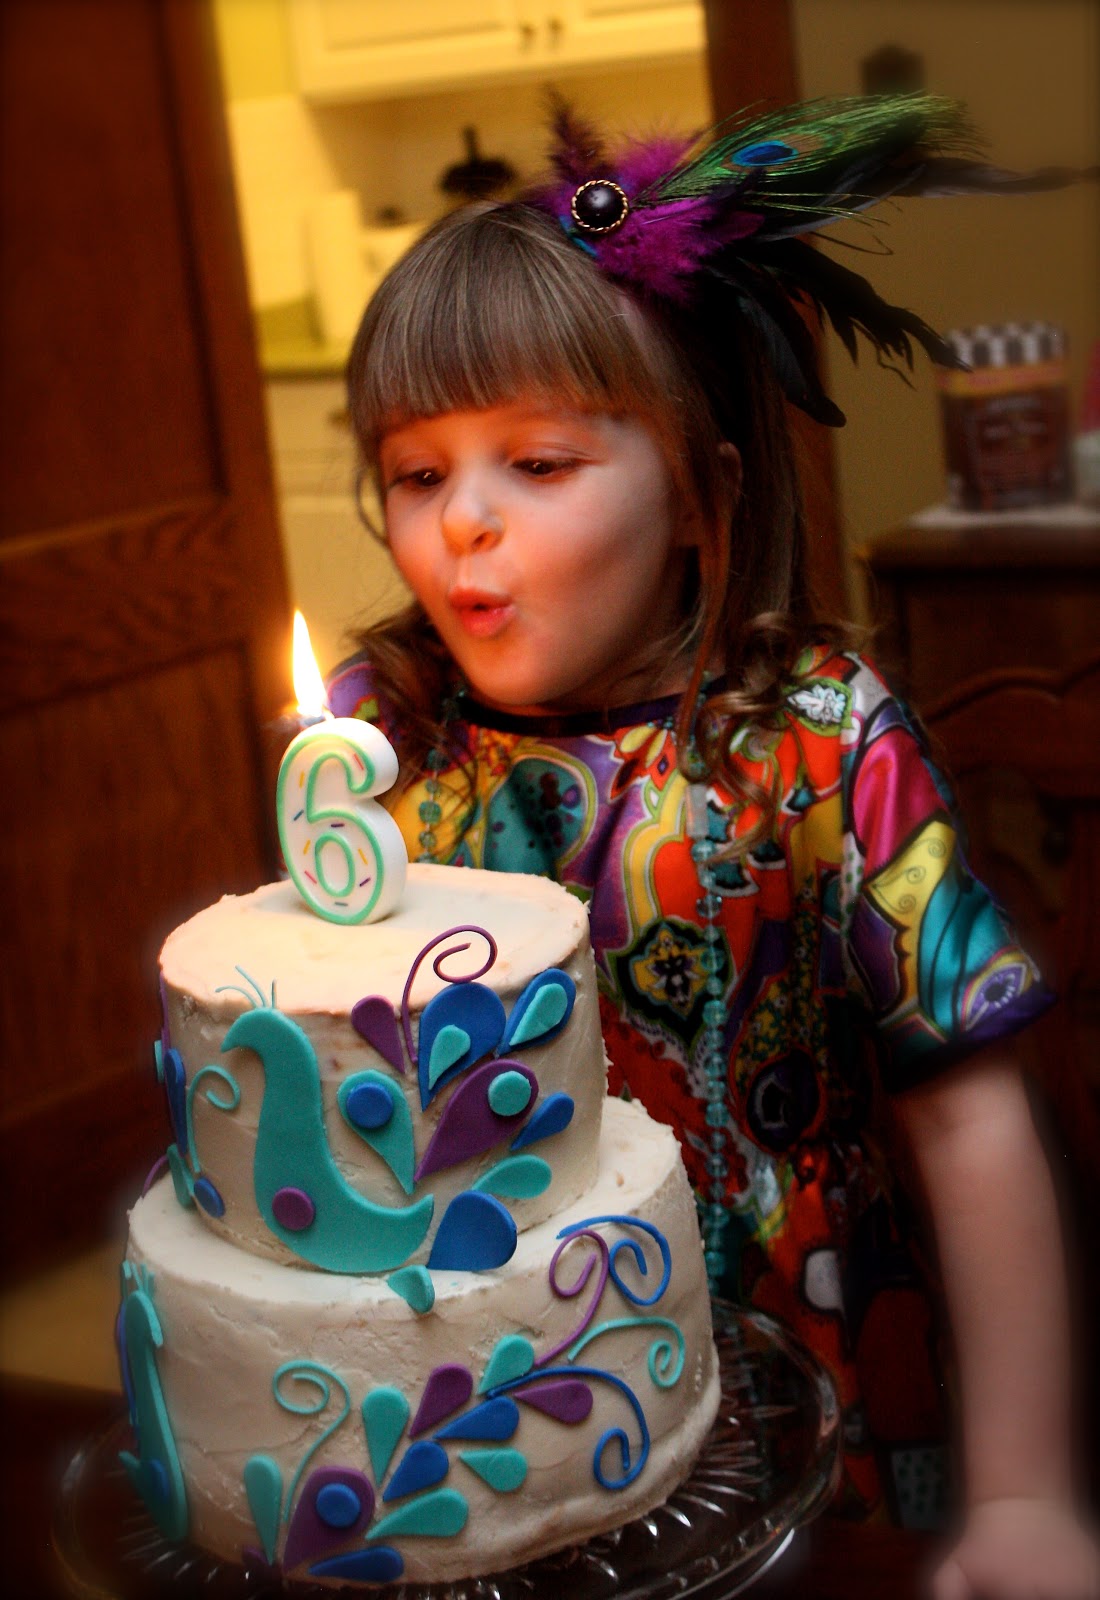
The cake:
This cake reminded me a lot of the blue bird cake I did a couple of years ago.  


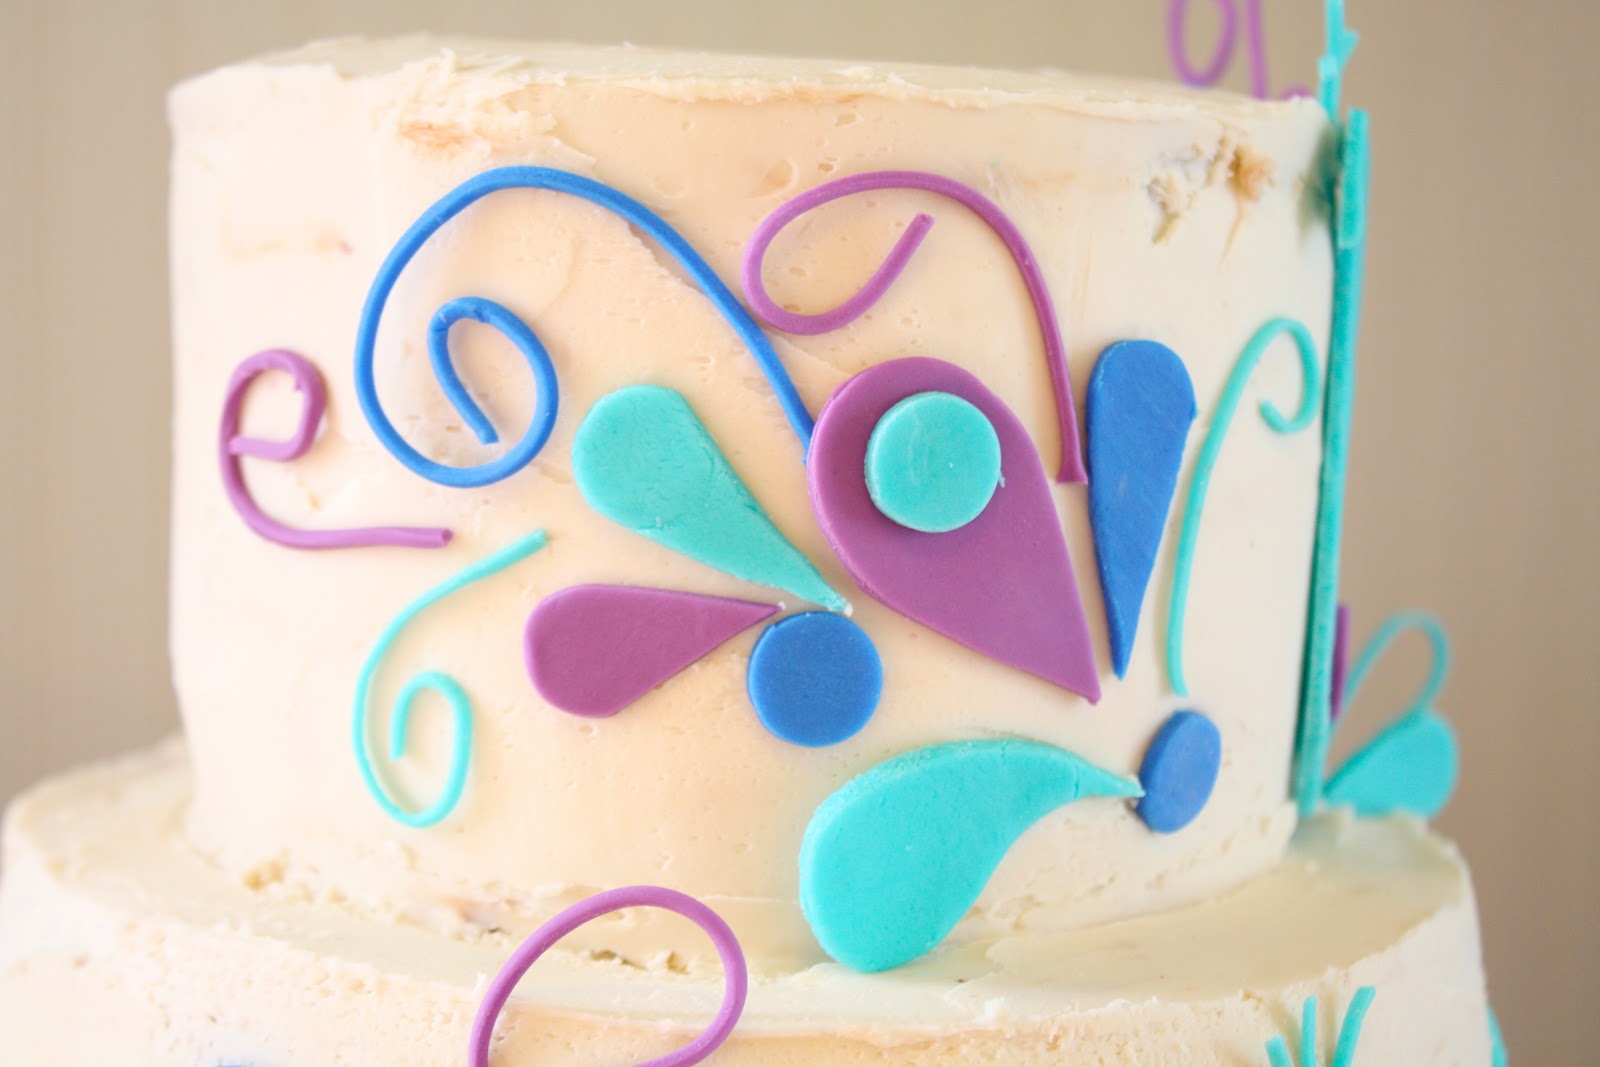
I love doing fun whimsical shapes on cakes.  

While Kate loved the outside of the cake, the rest of us were loving the inside. I hate to brag but this cake was pretty dang good. It was super moist with three layers of chocolate ganache inside. YUM. 

I sure love this girl. I think we are the most alike of all my kids. She is the middle child and kinda takes care of herself. She seeks out attention by doing good things not acting out. 

Some things I want to remember: She requested Ramen noodles for dinner, luckily I talked her into spaghetti noodles with alfredo. And she came home from school with a birthday present from a boy, her "boyfriend".

I'm linking to Girl Inspired and Here

Monday, March 11, 2013

A Royal Birthday


 My baby girl turned 4. It was a bitter sweet birthday for me. She chose Disney's newest princess, Sofia the First, as a theme.  Even though I'm not a big fan of the whole disney princess thing, I've tried to embrace it over the last 8 or so year for the sake of my girls. During my preparations, I realized that this would probably be the last time I did a princess themed party. I thought I would be thrilled and I am, but a small part of me was sad that I've reached the end of a phase.  

I shouldn't really call our little celebration a party. We simply had a family dinner and cake, but it was perfect. 
My little princess, I think she looks just like Sofia.

I decorated the house the night before so she would be surprised when she woke up. My husband thinks I'm crazy when I decorate for a small family dinner, but I love making things magical.

I was so excited about this Sofia bunting, she didn't even notice it with all the balloons on the floor. 

I usually make a special outfit for birthdays. I debated on making a real sofia dress or a simple dress she  could wear to church and school. I went with a Sofia-inspired dress. While I was sewing it up, she kept telling me I was making it all wrong and it didn't look like Sofia's. I was worried, but turns out she loves it and won't take off. 

There has been a lot of twirling. 

The Crown Jewels


The Cake
I love how it turned out. I'm so grateful to my sister who showed up and helped decorate. As always, I had way more on my plate than I planned, and it wouldn't have been finished on time without her. 

I used Wilton Sugar Sheets for the flowers. I got mine at Walmart. I'm a big fan. In fact, I've used them with my Silhouette before too.

I love the tufting and pearls on the top layer. 

Lucky for me we live by a Disney store, I used the sofia from a figure set for the topper.  

I think I'll enjoy every last moment of her being a princess before it ends.

Wednesday, March 6, 2013

{sweet} baby cakes

I love it when good things happen to good people, to much of life is unfair. After 12 years of waiting, one of my dear friends was finally able to start a family through adoption.  It was a miracle and happened suddenly, so some friends and I whipped up a shower over the weekend.

Of course I had to dress up the mantle for the affair.

First, I made this painted burlap banner.  It's a project I've wanted to try for a while and I love how it turned out. 

Once I was done with the banner, I had all this leftover paint and just wanted to use it on something. That is when I remembered some wood blocks I had from a past project. I used my western stamp set for the letters. It wasn't necessary but turned out to be a nice gift for baby.  

Does my sign look familiar? I used it HERE. It used to say FAITH but I altered the lettering a little. If you look close you can see what was erased and what I kept.

I got a new chalk marker since my old one ran out. I don't think I can tell you enough how much I love chalk art and these chalk markers. AMAZING.  

The drink station. We served a mint lime punch and pretty flavored water. 

I'm loving multi layered bunting right now. I found a package of oblong paper doilies that were perfect and altered my SPRING banner to spell out the new baby's name.  I think I put about 30minutes total into all four banners. 

Since it was a late-afternoon open house, we stuck with simple finger foods and a few desserts, including my favorite mint brownies. 

The invite. I was able to make these up in minutes using my FREE Silhouette Studio software. If you are like me and don't own photoshop it's a great way to design and print your own invitations. I've told you about it in the past, but wanted to give it another shout-out.

It was nice to celebrate something so wonderful and exciting.

HERE is a list of parties I link to.

Tuesday, February 26, 2013

double-sided adhesive sheets, glitter and a shamrock

When the nice guys at silhouette asked if I wanted to try their new double-sided adhesive sheets, I jumped at the chance. 

My girls love glitter. In fact when I pulled out the glitter to test it out, they all went crazy and started grabbing paper and glue before I could stop them. We're looking forward to some fun projects in the future like sparkly easter eggs or halloween signs. I didn't have any of the super fine glitter, but what we had worked fine for now. 

We decided to make a little sign for St Paddy's. 
We started with a clover, sticking it right to a little canvas mat we had. 

We covered it with green, then added {LUCKY} to the corner. Honestly, the sheets were a little harder to handle than I anticipated. I was in a hurry and with these you want to take your time. Once they touch a surface, they can't be moved. So, my C may or may not look a little like a G.

Despite that I am still a big fan. You would never be able to accomplish the same look with glue. I absolutely love the way it sparkles when I walk past. 

I placed it next to our Pot O' Gold.

subway art from HERE
lucky banner found HERE

And since I am way behind on my Thank-you's for all help and gifts for the baby and made a few cards too.

A few recommendations, take your time, don't use this when you are in a hurry. Use fine glitter, it will fill in better. Also, I would cut with a little longer blade length then recommended.
Thanks Silhouette for another great product. 

Friday, February 15, 2013

A Lovely Day

I hope everyone had a fabulous Valentines Day. We sure did. 

My husband and I used to make a special effort to go out alone for Valentines, but a few years ago things didn't work out and we spent the night with the kids. We had so much more fun celebrating as a family we've never gone back.

 The kids love having a fancy dinner. Kate asked every night this week if dinner was "Valentines Dinner." Using giant red goblets and drinking sparking juice is their favorite part.

 Did you notice the cake? 

It was red velvet, super moist and to die for.  

After dinner we played a Valentines version of cherades. It was a lot of fun. 

Friday, February 8, 2013

Banana's For You Valentines

We're going bananas over our valentines this year and hope you will too.

While searching Amazon we came across these cute monkey figures and knew we had to use them. 

Then we got a little crazy and added some Banana Heads to the mix,

And came up with this

And this.
We did our own twist but were inspired by another version HERE.

I had a hard time finding the right bag to put them in, but eventually found these at Michael's.
They're called archival bags and I found them in the wrapping section not with the other cellophane bags.

Overall I spent about $40 on supplies for 4 classrooms. That's $10 a classroom. Not cheap but just a little more than what you would pay for cards and a bag of candy. 

If you are interested, I downloaded the tags so you can print them yourself HERE.

You can find our valentines from previous years HERE and HERE.

LinkWithin

Related Posts with Thumbnails