Yeah, I finally finished the backpack pattern and tutorial.
I'm sorry it took so long, I had to make a new one since I didn't take any pictures of the process on the first one.
Some things to consider:
You can use this tutorial to make any kind of kids backpack. Instead of a face you could add a flower or a child's name.
This pattern is geared toward a toddler body. It's perfect for my 2 year old and almost too small for my 4 year old.
I used corduroy because it's the only fabric I had on hand. You can use any type of fabric but you may want to use interfacing if you are using a light weight fabric.
I also later discovered the d-rings on the straps didn't hold up to my busy 2 year old. I've added buttons to hold the straps together.
Click Below for the Tutorial
What you'll need:
1/2 to 1 yard of fabric for the body. Heavy weight fabrics work best.
1/4 yard of lining fabric.
1/4 yard of lining fabric.
scraps of white, black and red for face
heat n' bond
2 D-rings
2-4 buttons
Step 1: Print body and face patterns
(I couldn't get the body to print on the right scale. Add 1/2" around the edges to get the right size)
Body pattern HERE
and
Face pattern HERE
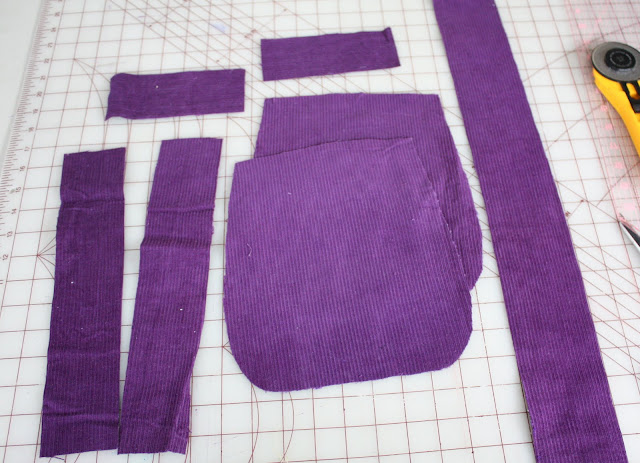
Step 2: cutting out all your pieces
-body front and back- use pattern( add 1/2 inch all the way around for seams)
1 strip - 3" x 26"
2 strips- 2-1/2" x 6"
2 strips- 2-1/2" x 12"
For the flap I cut two, 6" long and 7" wide rectangle and rounded the top with a bowl.
Step 3: sew on face
For the face, I applied some heat n' bond to the back of the colored fabric, then trace and cut out the face pieces. After I cut them out, I ironed them onto the front of the backpack and did a tight zigzag around all the edges with black thread. I also added smile lines to the ends of the mouth.
Step 4: sew straps
fold the 2-1/2"strips in half and sew around edges leaving the bottoms open. Turn right side out and top stitch sides. Repeat with all four straps. HERE is a good video for turning strips right side out.
Step 5: attach long straps
Pin and sew the two long strap to the bottom of the back body piece. I did mine centered about 3" apart.
Step 6: attach front and back to side strip
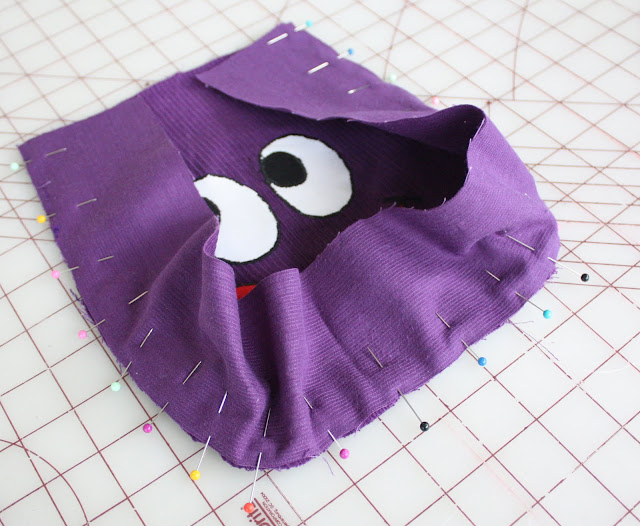
Line the top of the side strip (3"x 26") up with the top of the front body piece. Pin right sides together starting down one side around the bottom and up the other side. You'll have to manipulate the fabric a little around the curves. Just make sure the pieces are laying flat. Sew the around the edges.
Repeat again with the back piece. Keep the long straps up and out the top while pinning and sewing.
Step 7: attaching shorter straps and flap
Next I turned the bag right side out and attached the shorter straps. First I folded the straps in half around a D-ring and stitched a seam as close to the ring as possible to hold it in place. Then I secured the straps to the back of the backpack at the top. I placed them about an inch from the sides.
Sew the flap pieces right sides together. Turn them, iron and topstitch. I centered the flap over the straps and stitched across the top.
Step 8: cut and sew the lining.
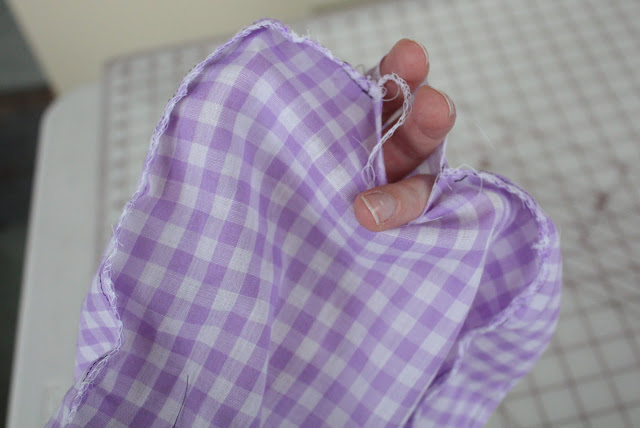
For the lining I cut another front, back and side piece and sewed them together the same as the main body pieces. Make sure to leave a 3" opening in the bottom.
Step 9: sew lining and main body together
tuck the main bag into the lining. Pin the tops right sides together and stitch around the top.
Then pull the main body through the hole in your lining. Check your seams and sew up the hole in the bottom of the lining.
Step 10: topstitch and side pleats
after tucking the lining back in I topstitched around the top. Then to keep the bag from flapping open, I did little pleats in the sides of the top opening. I just turned it inside out, pinched the sides together and sewed a little seam to hold it.
after tucking the lining back in I topstitched around the top. Then to keep the bag from flapping open, I did little pleats in the sides of the top opening. I just turned it inside out, pinched the sides together and sewed a little seam to hold it.
Step 11: add buttons to the straps
I added button holes to the ends of the long strips. Folding the long strap over the D-ring I measured and marked where I wanted the buttons. The first buttons fit my 4 year old, the second fit my 2 year old.
That's it. Let me know if you have any questions.
I would love to see any creations you make using this tutorial. Thanks.


25 comments:
That is so cute! I like the new look of your blog too.
Looks great. Are you taking more orders?
This is really Tami leaving you messages, not some wierd man named Joseph.
You did such a great job with this. My daughter would simply love it for her birthday next week!
btw Joseph, you SAY you are not some weird man, but I might question that statement as you are claiming to be a woman. :)
Love the new header photos and backpack is such a cutie.
This is so cute!!! I remember when my daughter was little it was hard to find backpacks small enough for her little body. I linked to your tutorial on Craft Gossip Sewing:
http://sewing.craftgossip.com/free-pattern-toddler-backpack-with-happy-face-applique/2011/04/15/
--Anne
Yay!!!! Thank you....I saw this a while back with out the tut. I have a 2 year old with diabetes and she has a back pack (a little big and not nearly as fun) to tote around her supplies when we leave the house. After a year of use it needs some changing and she will LOVE this! I am making it for her right now! Thank you for sharing! Finding purple corduroy will be interesting ;O
-Rachel
www.sweetavag.blogspot.com
I love this! I have been wanting a back pack for my little girl and this is too cute!!
Cute! Featured you today!
Amanda
www.todaystoptwenty.blogspot.com
This is amazingly awesome! My 22 month old came running while I was looking at your tut. and is now shrieking "Backpack! Backpack!" Looks like I'm going to have to dig deep and find my inner-sewing skills to make one! Thanks for the great instructions!
I think this is so cute. For some reason though I was reminded of the letter people. I love the eyes.
Aww, Backpack came out super cute! I love the size, just adorable! Thanks so much, I'll be linking.
I made one myself! Thank you for the applique and tutorial!!
http://lalalawrence.blogspot.com/2011/07/backpack.html
Thank you very much for the tutorial! You inspired me to make one for my daughter :)
http://craft-fair.blogspot.com/2011/09/doras-back-pack.html
You are a life saver!!!! I needed to make a Dora backpack for my daughter for Halloween and this post was PERFECT!!!! I made one and it turned out great! Thank you! :)
Hi.. thanks for sharing the tutorial, It's so Fun.. and i would like to use this tutorial to make fairy with lollipop backpack. :-). and if the backpack has been done, i will post it in my blog at:
http://perca-polkadot.blogspot.com/
--thank you--
I used your template and made my own too! Here's a link to my blog about it!
http://practicalbaby.blogspot.com/2012/02/toddler-back-pack-now-she-can-haul-her.html
Love this backpack, and I'm in the middle of making one right now! One question though, why keep a hole in the bottom of the lining if just one step later you sew it up?
Wow, you can tell I'm not done making it yet...sorry about my dumb question, I figured it out. :)
This will be my first Bag attempt, ive search the internet and this is the clearest example ive found... so well done x Wish me luck
Mwah
Just finished my son's Dora bag. I was so inspired by your tutorial, I got excited and made him a map to go in his backpack! Thank you for such great directions!
Hello! I don't know if you're still blogging, but I was wondering if you know what the dimensions are of the finished backpack? I want to make one to hold my kids' school books.
Hi! I came across this awhile ago and well I finally needed to make a backpack and remembered having this bookmarked. Thanks so much for this tutorial it was so simple to make. I made one for my son for preschool.
http://fulltimesahm.wordpress.com/2012/09/23/toddler-backpack/
This was a great tutorial. I was looking for a simple back pack pattern that I could use to make an Elmo back pack and this was PERFECT!
If you'd like to take a look at mine you can see it here http://notyournormalsteam.wordpress.com/2012/10/20/the-perfect-toddler-gift-elmo-backpack/
I gave you credit and a link back to here.
I have been searching high and low for a toddler back pack pattern that I like - I have made all my nieces little messenger bags with colouring books and crayons in for Easter and have been after one that I can use to make for my nephew! This is it! Thank you, I am going to be making it this evening with some camouflage fabric - perfect for a little boy! x
Post a Comment