Monday, November 29, 2010

Poor Neglected Blog

I told myself in the beginning that this little blog could only be a hobby.  That is why I don't sell anything and why I don't have ads.  Although I love creating and sharing things here, my blog has had to sit on the back burner for a while.  I wish I could say things were going to pick -up but they won't for two big reasons. 

Reason #1: this week is Chocolate week or if you my husband it's Hell week. 
Every year my mom, my sisters, my sister's in law and I get together to make hand dipped chocolates for an entire week.  You can read about last year HERE. We dip over 350 pounds of chocolates. 
Today was day one and we made half of the centers. We made 9 batches of carmel and 7 batches of fondant. I'm really tired. 


Reason #2: I've been spending all my crafting time making homemade gifts and I can't blog about them until after Christmas. I've learned that lesson the hard way. 

I do hope, however, that I will be able to share with you a Christmas banner tomorrow or Wednesday. 

And just because I love these eyeballs, I had to share this picture.  

I hope your Holidays are Merry and Bright. 

Friday, November 19, 2010

50 free holiday cards from Shutterfly

I am so excited about this. Giving and receiving Christmas cards during the holidays is one of my favorite traditions. When I was little my mom would tape each card and picture we received to the front door. As I got a little older it became my job to hang the cards.  I looked forward to coming home from school and going through the mail. I always felt so loved and blessed to have so many people care enough about our family to send us a card. It was these kinds of feelings that made Christmas so magical for me.

Of course the best cards come with a picture. Sometimes I have a really had time finding the perfect card to match our family photo.  I like my card to be cohesive in color and style. I won't have to worry about that this year when I get my Christmas Cards from Shutterfly.  They have over 800 options to choose from and they are all amazing.

I'm not sure what picture or pictures we will use yet, but here are a couple of my favorite cards.

It would be fun to use this folded Christmas Card.  I like that there is a spot for each of my four kids.

I love the simplicity of this Stationary Card. 

I love the look of untradional colors and styles but I always end up picking something traditional. Maybe someday I'll get crazy and do something with blue and brown.  I love this look. 


While I'm getting my cards, I might as well get a Calendar for Grandma. It is her favorite gift. 

I think she'll love the personalized dates with photos and text. 

Find out how you can get 50 free holiday cards go HERE.

Thursday, November 18, 2010

DIY Drape Cardigan


I really like to wear cardigans.  They keep me warm in the winter, but I can take them off if I get too hot. I especially like lightweight cardigans. I've been wanting to get a drape cardigan for a while. They seamed so cozy and comfortable yet still stylish. 


The cardigan is easy to make with only a few cuts and seams and since it's made of knit I didn't finish my edges. 


I found these 5 yard bolts of knits at Wal-mart. They were originally $5 each but I got mine for $2.50 each. They are a looser woven knit like a light weight sweater instead of a t-shirt. 

The first thing I did was a cut a 30" length off of the bolt. My bolt had a 63" width. This left me with a rectangle that was 30" by 63".

Next I took one of my own long sleeve t-shirts, turned it inside out and pulled the sleeves inside. I pinned the arm opening closed to help it hold it's shape.  

Next, I measured the length just under the armpits. Mine was 19".

Then, I folded my fabric in-half horizontally and marked the middle with a pin. 
Using a ruler as a guide I folded in the sides, till I had 9-1/2" on both sides of my pin. I was left with a folded rectangle that was 19" by 30". I kind of pilled the extra length of fabric in the center. 

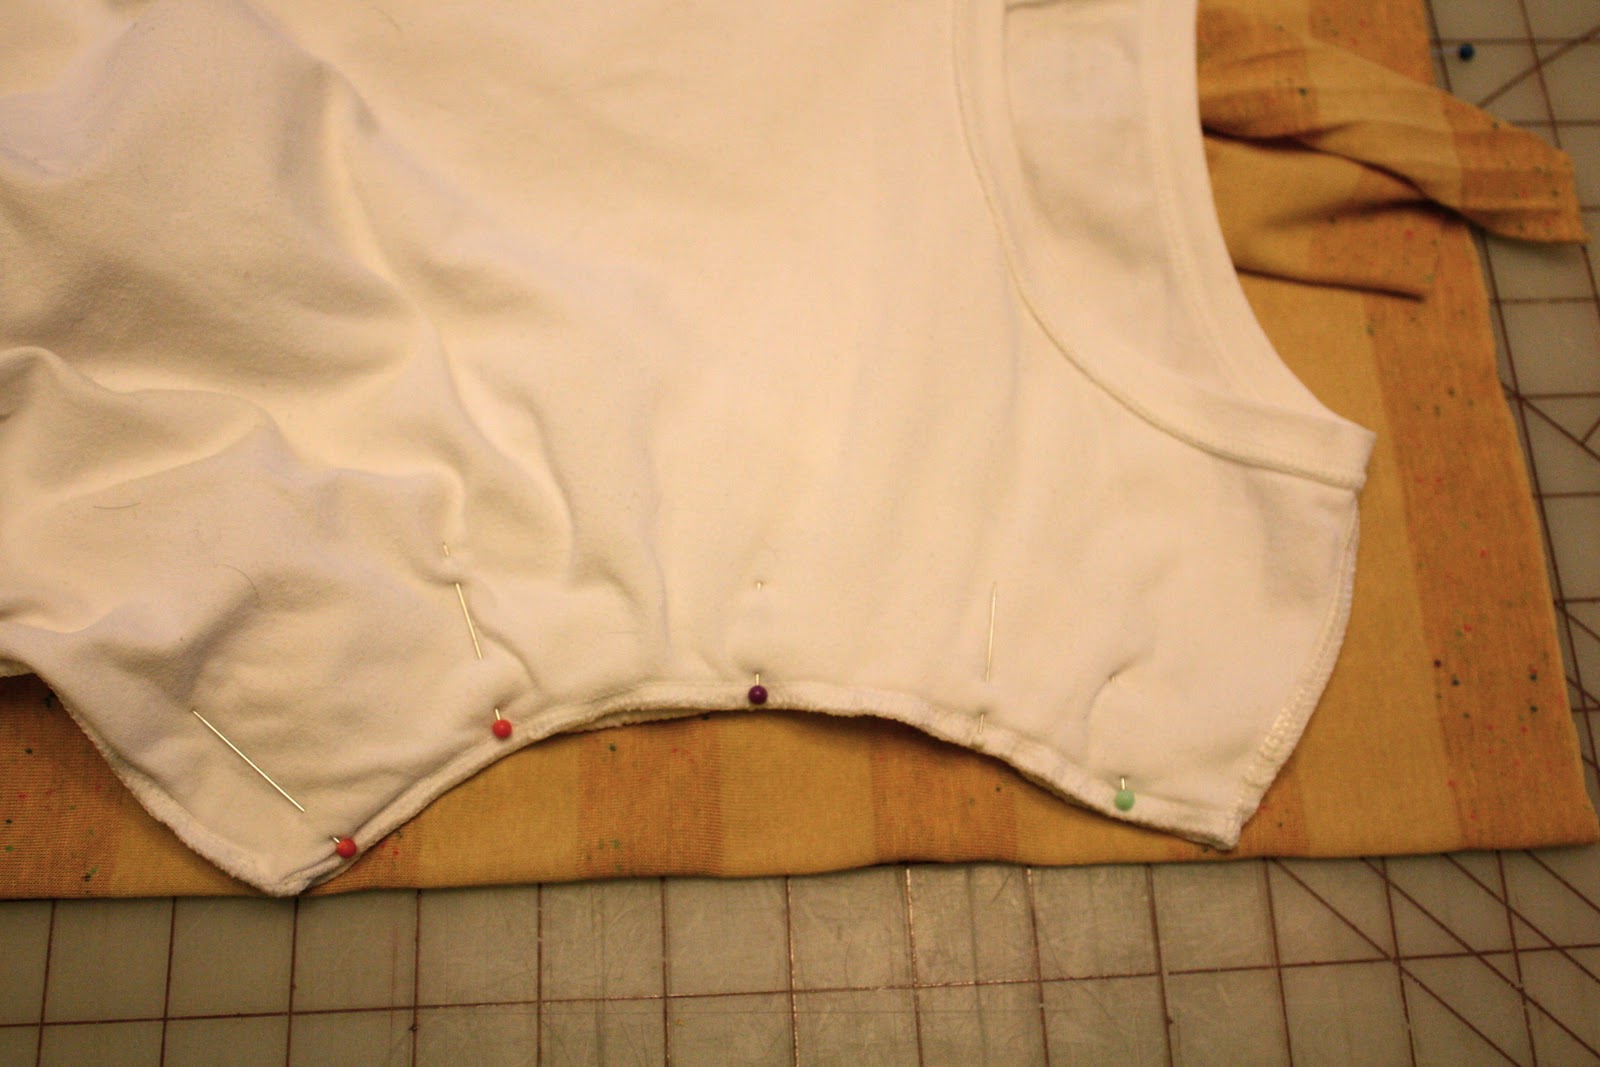
Now I was ready to cut my armholes. I positioned the shirt armhole right along the fold. 

I would cut the armhole out 8" down from the top of the fabric. I actually cut mine at 3" and had to add the extra length later. 

After cutting the armhole I cute a straight line down the side following the fold.

Then I folded the fabric in half again and used the armhole I just cut as the pattern for the other side. I cut a straight line down the other side as well. 

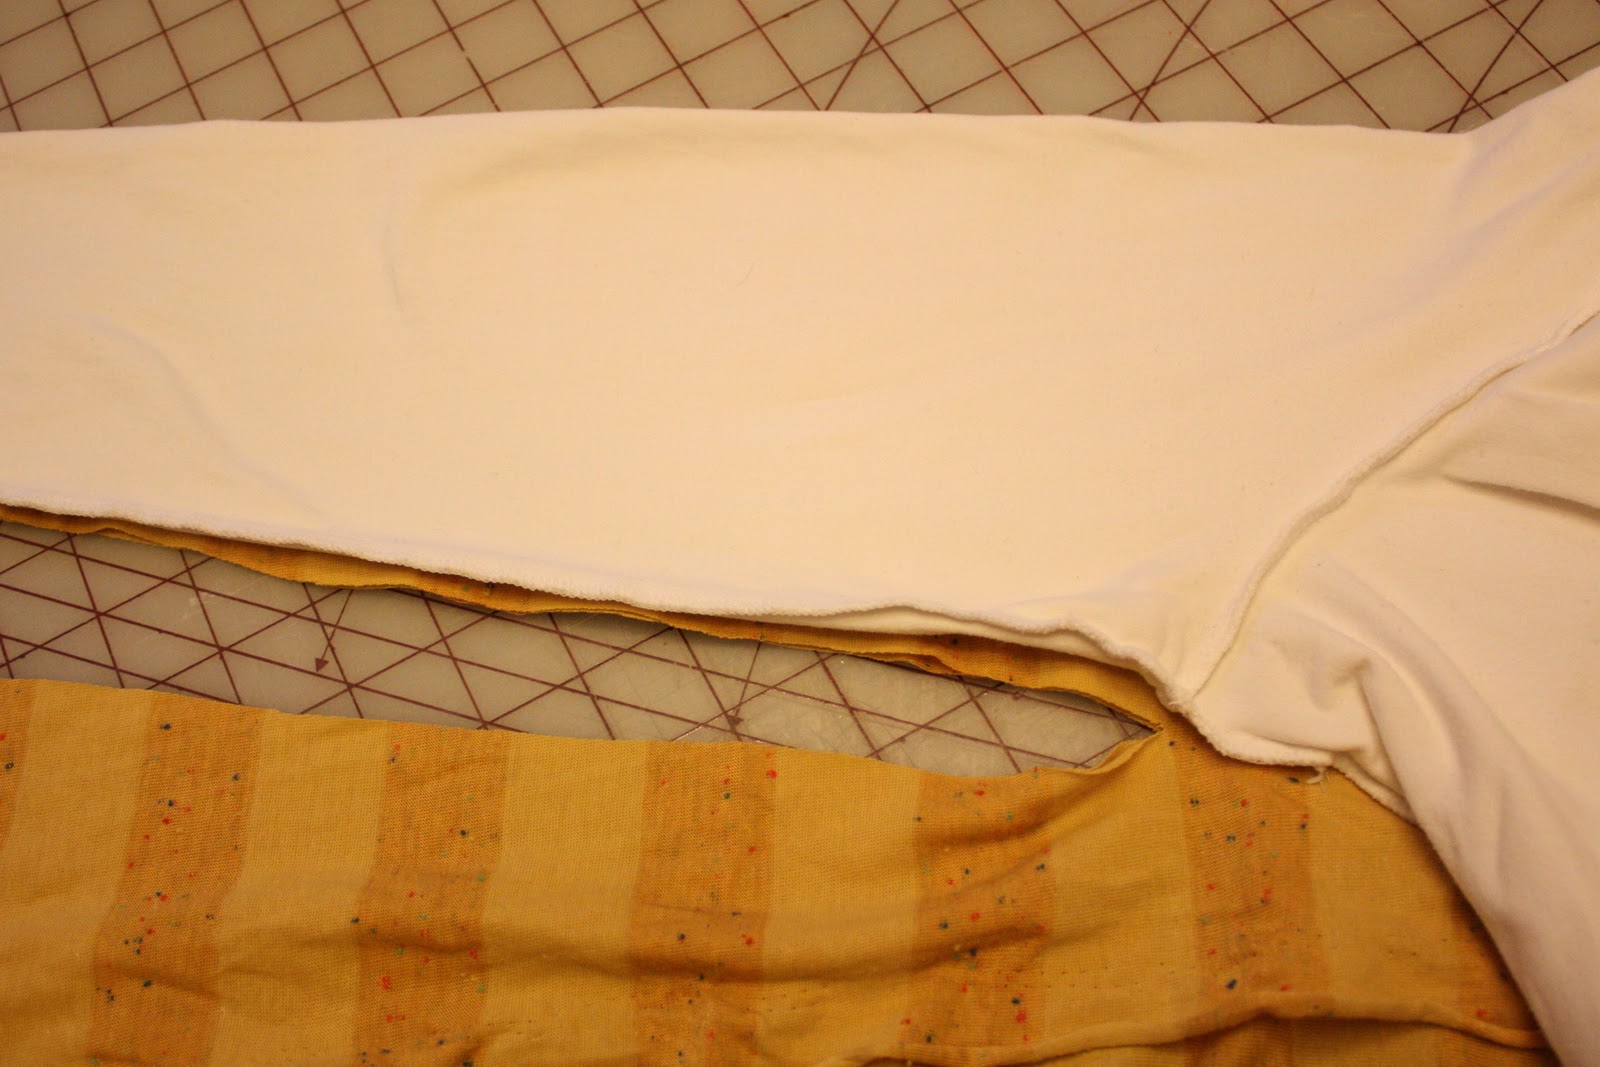
After making both armholes and cuts down the sides I cut out my sleeves. I used my t-shirt sleeve as a pattern. Once it's lined up, cut up to the armpit seams.


Once it's lined up, cut up to the armpit seams.

To cut the curve at the top of the sleeve, I lined up the arm hole from the body piece. 


After I cut one sleeve I used it as a pattern for the other sleeve. 

Next, I sewed on the sleeves. I opened the shirt pieces and laid them flat with the right side up. Then I lined up the middle of the sleeve with the shoulder seam and pinned them right sides together. I followed the curve on both sides and pinned every half inch or so. 

It will look like this when your done. It should be a perfect fit, be careful not to pull or stretch the knit.

After the sewing the arms on, I sewed up the sleeve and down the sides.
I also hemmed the ends of the sleeves, but I left all the edges unfinished.  The edges that weren't a selvage rolled a little, which I liked. 


FYI, I also made one for my daughter, when I did hers I didn't cut the seams down the side. All I cut were armholes and sewed the sleeves into the hole.  It worked, but I think it's easier to sew the sleeves on with the open sides. 

Let me know if you have any questions. 

Check out THESE super cool parties 
I link too. 

Tuesday, November 16, 2010

Celebrating Thanksgiving

Hello! I've been away from home for almost a week.  My family and I enjoyed a nice vacation to Washington DC. My husband and son flew home Sunday, while my daughters and I stayed a little longer to spend time with my sister in Maryland.  It's been so nice not to worry about anything, except maybe that I shouldn't be eating so many of my sisters homemade cinnamon rolls.
I just realized that Thanksgiving has snuck up on me faster than I realized.  I wanted to share some of the things I've been thinking about to help us celebrate.

Every year my sister and I were in charge of making gum drop turkeys for each place setting.  It was my favorite traditon at Thanksgiving.  Sometimes we would make fifty or more so everyone in our large extended family could have one. I've tried to make them every year with my kids.


I'm not a huge fan of Gum drops so I think this year we will make these trukeys by Nike at Thrive. They look modern and yummy. You can find the tutorial HERE.
Making turkey's is a perfect activity for kids to keep them busy while dinner is being prepared. Here are a couple other ideas I like as well.


I would love to try and make these simple paper hats and bonnets. You can find Martha's instructions for them HERE.

My daughter would think I was the coolest mom ever if I helped her make a few of these Corn Husk Dolls. Family Fun shows you how to make them with tamale wrappers found at the Grocery Store. Get the tutorial HERE.

How about you? I love hearing how others celebrate. What do you do to celebrate while dinner is cooking?

Thursday, November 11, 2010

Pear Pie

I know I don't usually share recipes here, but almost every time I make this Pear Pie I get asked for the recipe. It's always a hit and it's super easy to make.  I love that people think it's super complicated and a secret family recipe.  I actually got the recipe from my sister in law and I think she found it online.  

If your looking for a something besides pumpkin pie to serve at Thanksgiving look no further. 

Ingredients:
-9" unbaked pie crust- (I usually use Betty Crocker's recipe w/ half butter, half shortening) 
-3 eggs
-1/3 cup all-purpose flour
-1 cup white sugar
-1 teaspoon almond extract
-1/4 cup melted butter
-3 pears-peeled, cored and sliced

Directions:
1. Preheat oven to 375 degrees
2. In large bowl, combine eggs, flour, sugar, almond extract and butter, Pour into unbaked pie crust. Arrange sliced pears in spokes radiating from center.
3. Bake in preheated oven for 15 minutes, then reduce to 350 degrees and bake for 25 to 35 minutes or until custard is firm.
Cool completely before serving.

This was what it looks like before putting it into the oven.

I like to bake it in a spring form pan.  This makes it especially easy to do the crust.  I don't worry about making fancy edges.  I like the rugged edges I get when I remove the sides of the pan. 

Enjoy!

Monday, November 8, 2010

Give Thanks Banner-Free Printable

I thought some of you would be interested in a free printable for the banner hanging on my mantel. 
It is super easy to make. I made mine in about 20 minutes and if you're like me you have all the supplies on hand, making this a free project. 

Step One- print the letters: click on the links below and print

*make sure you print the letters on the landscape paper setting.


I printed on brown paper but you could use off white, orange, yellow, or what ever you have that you think will look good. 

Step Two - cut out your letters. I left a small border. 

Step Three - cut slits in the top corners. You could also use a hole punch. 

 Step Four - Thread your ribbon through the openings. 

That's it, you're ready to hang and enjoy.

Let me know if you have any problems or questions.

CHECK OUT THESE PARTIES I LINK TO.

Friday, November 5, 2010

Thanksgiving mantel and other decor

I've tried to give Thanksgiving the credit it deserves.  I'm sure that if I didn't have a few things for Thanksgiving that I loved, I'd probably skip it and decorate for Christmas early. I won't lie it's a huge temptation. I love our home at Christmas. 

Our Thanksgiving decor started several years ago with these blocks, I truly love them, and look forward to pulling them out. 

I tied a few ears of indian corn to the hurricanes that line my windows. 


The candles were already wrapped in fallish paper thanks to my friend Cha Cha. I think I paid 50 cents for the ears of corn and all my leaves are from the dollar store. 

The piano top decor hasn't changed much from last year


Do you like my cornucopia? It was one of my first tutorials.  You can find it HERE. I would still like to get some gourds for it next time I'm a the store. 

The following items are also very important to me. 
 These pots and leaves were made by my kids at school.  I love and cherish them.  I'm praying that my other kids get the same teacher so we can add to our collection. 

And finally, I was happy to pull out the leaf table runner again.  It didn't work with our Halloween decor. You can find the tutorial for this one HERE

I have so many fun things to try for Thanksgiving.  I hope can find some time to do a few. My month is looking crazier than ever. You may see lots of posts on what I want to do, instead of what I've actually done. 

Here is a list of parties I link to.  

LinkWithin

Related Posts with Thumbnails